Wednesday, 7 May 2014

Baked Creamy Egg in a Crispy Cup

baked egg

This is a quick and tasty way to cook egg. It's similar to cottage eggs, where the egg is baked in a ramekin without a bread lining, which is still delicious, but you have baked-on egg to contend with when washing up.

Ingredients (per egg)


1 egg
1 slice of bread
butter
2 tsp double cream
1 grind of salt
1 grind of black pepper

Method


Cut the crusts off the slice of bread and roll flat with a rolling pin.
Spread with butter.
Push the bread, butter side down, into a ramekin dish or a muffin tin.
As you push the bread down, folds of bread will form.  You can just press these to the edges.
If you make any holes in the bread as you press it into the tin, rip off a little bread from the top and press it down over the hole.
Crack in one egg.
Season with salt and pepper.


Add the cream.

Bake for 15 minutes at 180 C.

Serve.

My kids love these.  Some eat them with their fingers, some eat them with a spoon, before eating the bread cup.  Come to think of it, I love these with a salad for a lunch or light dinner.

You could vary the seasoning of the egg to your personal taste.  Perhaps some finely chopped parsley or smoked paprika.


Sunday, 20 April 2014

Quick Flammekuchen, tarte flambee

I believe tarte flambée, or flammekuchen, is a dish from the Alsace region.  Traditionally a thin leavened bread topped with crème fraîche, onions and bacon lardons, then baked in a wood fired oven.

This quick recipe I improvised one lunch time when there was not much in the fridge for lunch, save for an open pack of ham, crème fraîche and a small onion that my son had brought back from a gardening club at school.  Traditionally, I assume the bread would be leavened with yeast, but this quick version uses self-raising flour.

For the base

Self raising flour, a heap the size of a tennis ball.
Pinch of salt
Half a teaspoon dried mixed herbs
A glug of garlic infused oil, say about 2 tsp
Enough cold water to make a soft dough.

Don't worry if you add a little too much water and the dough is sticky, just add a little more flour until the dough stops sticking to your hands as you work it.
Roll out the dough to an oval or oblong shape to a few millimeters thick.

For the topping

Spoon on a tablespoon or two of crème fraîche and spread evenly with the back of the spoon. Sprinkle with a chopped shallot or small onion. Chop up ham and scatter on top, or use bacon lardons.

Bake at 180 - 200 C for about 10 minutes.

Sunday, 1 December 2013

Snowball pudding

A family food tradition at Christmas from my wife's side of the family, I was smitten with the first spoonful and was keen to keep this tradition going.  Far simpler than a standard Christmas pud and less heavy.

Ingredients

11 oz can mandarin oranges
2 oz sultanas
2 oz raisins
2 Tbsp sherry (Harvey's Bristol Cream)
3 oz glacé cherries
4 oz butter
4 oz icing sugar
2 oz ground almonds
8 trifle sponges
2 Tbsp milk
5 fl oz double cream

Method

Lightly butter a 1 pint pudding basin.
Drain mandarins.
Place sultanas and raisins in a small bowl and add the sherry.
Cut the cherries into quarters and chop the mandarins.
Cream the butter and icing sugar until light and fluffy.
Fold in ground almonds and cherries.
Crumble in the sponges and fold in the mandarins, sultanas, raisins and sherry.
Place this mixture into the buttered pudding bowl, pressing down firmly and levelling the top with the back of a spoon.
Cover with foil and chill in the fridge for up to 4 days.
Remove from the fridge and uncover.
Run a knife round the top and dip in warm water for 30 seconds before upending onto a serving plate.
Whip the cream and cover the pudding to look like a snowball.
Serve as is or decorate as you like.

Merry Christmas!

Tuesday, 13 August 2013

Tarte aux Pruneaux

tarte aux pruneaux recipe
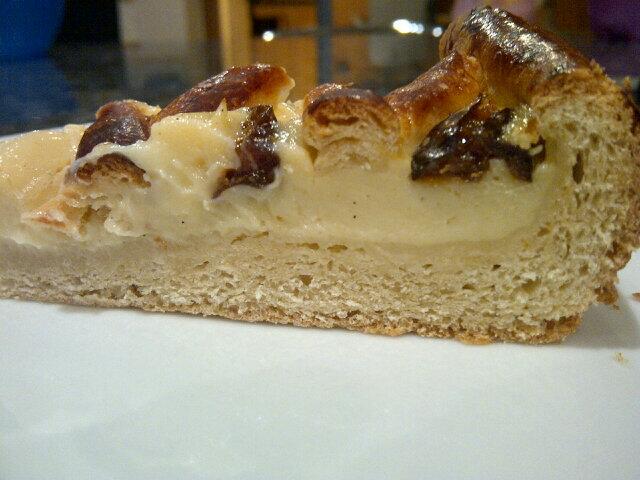
I was so taken with this tart when I bought one from a patisserie in the north of France, that I quizzed the baker on how to make it.  The leavened pastry (pate levee) takes a little time to make, with all the resting stages, but I think it is well worth the wait.  Best served once cooled to room temperature.

Times

about a total of
20 mins work,
2 hour 40 mins resting,
30 mins baking

Ingredients

fresh yeast in warm milk
250g plain flour
80g warm milk
15 fresh yeast
1 egg, beaten
25g caster sugar
5g salt
100g soft butter
1 pint pastry cream (creme patissiere)
Partially rehydrated prunes
milk and yeast being added to flour

Equipment

25cm (10 inch) cake tin
Rolling pin
Mixing bowl

egg into flour Method

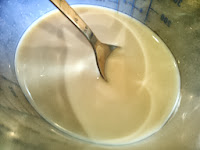
Dissolve the yeast in the warm milk
and add to the flour in a bowl, then start mixing.


Add the egg
Then the sugar and salt.
Continue to mix with a dough hook or kneed to a dough.

Leave to rest at room temperature for 10 minutes.

role out pastry to an inch beyond tin size
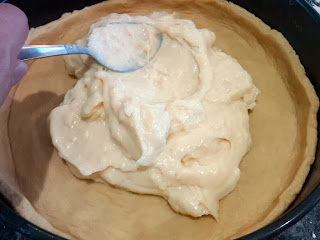
spread out pastry cream
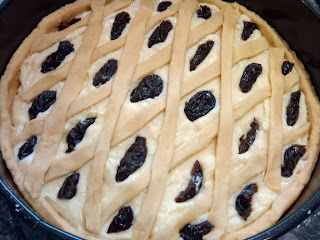
push prunes between lattice work
Add the soft butter and kneed in as best you can. The dough may seem like it's disintegrating and not likely to recover, but keep kneeding away. Eventually the dough will come together and come away from the work surface quite nicely.

Cover and leave to prove at room temperature for an hour.

Transfer to the fridge for half an hour to firm up the dough.

Mould the dough in your hands to an even shaped disc then roll out on a floured surface to about 3mm thick.

Place the cake tin on the pastry and cut a disc around 3cm wider than the tin edge.

Line the tin with the pastry allowing the excess to form the sides of the tart.

Fill with a pint of Creme Patissiere and spread evenly over the base.

Use the off-cuts of pastry to form a lattice work and push halves of partially rehydrated prunes into the creme patissiere between the latticework.

Leave to prove for an hour.

Brush the pastry with beaten egg.

tarte aux pruneauxBake at 180 C for 10 minutes.

Reduce the heat to 150 C for 20 minutes.

Leave to cool and serve at room temperature.


If you wish to see a video of me making the pastry, this time for a plain tarte a la creme, there is a YouTube video, below.


and to make the creme patissiere, here's another video:


Wednesday, 12 June 2013

Granola

60ml vegetable oil
130ml maple syrup
60ml honey
1 tsp vanilla extract
300g rolled oats
100g pecans, roughly chopped
100g almonds, roughly chopped

Mix the oil, maple syrup, honey and vanilla in a large bowl. Add the remaining ingredients and mix..
Tip this mixture onto two baking sheets and spread evenly. Bake for 25-30 mins at 140C.
Leave to cool then transfer to a kilner jar or other airtight container, it should break-up into "clusters" as you transfer it.

This is also a great way of using the crushed up bits of purchased cereal left in the bottom of packs, just add to the mix reducing the amount of oats by the weight off added cerials:

Friday, 7 December 2012

Pancetta and Parmesan Pasta with savoury custard


I've cooked this quick and simple dish for years and referred to it as Carbonara, but if you want to be pedantic, and many people do, it's not a traditional Carbonara. As I understand it, it would not traditionally contain cream. I'm all for respecting tradition, but this recipe is so popular with my family, that I shall continue to incorporate cream into the dish, but will not claim it's pasta carbonara.

Ingredients


1 pack of lardons or pancetta cubes

3 eggs

Handful of freshly grated parmesan


Double cream 60 to 80ml

Grind of black pepper

Pasta for 2 people


Method

Place the lardons in a dry, non-stick pan over a medium heat. As the fat on the lardons heats up, it liquifies and cooks the meat. When cooked to a deep colour and crisp, remove from the heat and save for later.
Start cooking the pasta.


Break the eggs into a bowl and add the parmesan, cream and a grind of pepper, then mix together with a fork.

When cooked, drain the pasta and return to its, still hot, saucepan. Add the creamy muixture and the reserved crispy lardons and stir over a medium heat. In a traditional carbonara the sauce would cook in the heat of the cooked pasta, but we need heat here to thicken what is effectively a bacon and parmesan custard. Keep stirring until the sauce thickens and clings nicely to the pasta.
Serve into warmed pasta bowls and consume greedily with a glass of robust white wine.


Saturday, 24 November 2012

Strong Ginger Beer

This will produce a small batch (5 litres) of strong (~7%abv) warming ginger beer, not as sweet as Crabbies Ginger Beer but richer in maltiness.


Ingredients

1kg of dark or medium, dry malt extract (or 1.3kg of liquid malt extract)
300g root ginger
500g honey (optional, but will up the strength to nearer 8%)
Sachet of Ale Yeast

Method

Cut the ginger into small pieces and bash in a pestle and mortar (or in a freezer bag with a rolling pin)
Boil a litre of water in a large saucepan and add the bashed ginger and the malt extract.
Stir on a high heat until the malt has dissolved, it may form clumps until the water gets hot enough.
Once boiling and all the malt has dissolved, remove from the heat and add 4 litres of cold water, if using honey then add just before the cold water.

Please note: after boiling is over, any equipment coming into contact with this brew should be sanitised and this can be performed with a range of products from a home brew shop.  If you can't get to a home brew shop, you could use a product for sanitising babies' bottles, but if you can't get to a home brew shop, you will probably also need to compromise on two other key ingredients by using bread yeast and ordinary malt extract.  It will still work using these ingredients but the finished beer will not be quite as fine as if ale yeast and brewing grade malt is used.
Check the temperature, if above 22 C, place the pan in a sink of running cold water, stirring until the temperature comes down to a level that the yeast can cope with.  This is usually stated on the pack of yeast, but for an ale yeast, this is typically 18-22 C.  The stirring will serve to speed the cooling process and, if robust enough, will help aerate the malt solution (known as wort in brewing terms, pronounced "wert") dissolving gasses lost from the solution when boiled; An aerated wort is a better environment for the yeast to start-off in.
When at the right temperature, pour the wort into a sanitised fermenting bin.  The fermenting bin or bucket is a food grade plastic bucket, but you can use a container of any food grade material, such as a glass demijohn or carboy.  Sanitisation cleans the container to a level where there is near-as-dammit no microbes present to compete with the yeast for colonisation of the wort that is about to fill the bucket.
Once in the fermenting bin, add the yeast and stir vigorously for a minute to give the yeast a kick start.  Place a lid loosely on the bucket, to prevent anything falling or crawling into the beer but not sealed, so the carbon dioxide gas produced from fermentation can escape.  A sealed container would swell with built-up pressure and eventually blow making quite a mess.  If desired, you could use a container fitted with a bubble trap which allows the gas to escape and better protects the beer from ingress of anything else, but this is not absolutely necessary - I hardly ever bother.  However, the bubble trap will give you an indication of the progress of fermentation:  the frequency of bubbling slows right down then stops when fermentation is over.
After a couple of weeks or when the fermentation is over you are ready to bottle the ginger beer.  To be sure the fermentation is over, you should use a hydrometer and when the reading is low enough and stable for a few days, you can bottle.
As ever: sanitise bottles and equipment.  If using a syphon tube, make sure the bits of ginger won't block it, by using an attachment that sits on the base of the fermenting bin that won't block, or by attaching a small piece of muslin cloth to the end of the tube.
Prime each bottle with household sugar at the rate of one teaspoon per litre of beer.  Seal the bottles and leave at room temperature for a week for the sugar to be fermented to alcohol and carbon dioxide.  Then leave in a cool or cold place for a few weeks for the carbon dioxide to dissolve in the beer, to carbonate it.
If you are unsure if the beer had fully fermented before bottling, use plastic bottles.  If they blow, they will still make a mess, but not quite as scary as exploding glass bottles.
When ready to drink, handle the bottles gently so as not to kick-up the sediment and pour in a slow and smooth single motion, with light behind the bottle so you can see any sediment that may come with the last bit of the beer in the bottle.
Sit back and enjoy the beer, the maltiness and ginger giving a warm feeling on a cold day.