Friday, 7 December 2012

Pancetta and Parmesan Pasta with savoury custard


I've cooked this quick and simple dish for years and referred to it as Carbonara, but if you want to be pedantic, and many people do, it's not a traditional Carbonara. As I understand it, it would not traditionally contain cream. I'm all for respecting tradition, but this recipe is so popular with my family, that I shall continue to incorporate cream into the dish, but will not claim it's pasta carbonara.

Ingredients


1 pack of lardons or pancetta cubes

3 eggs

Handful of freshly grated parmesan


Double cream 60 to 80ml

Grind of black pepper

Pasta for 2 people


Method

Place the lardons in a dry, non-stick pan over a medium heat. As the fat on the lardons heats up, it liquifies and cooks the meat. When cooked to a deep colour and crisp, remove from the heat and save for later.
Start cooking the pasta.


Break the eggs into a bowl and add the parmesan, cream and a grind of pepper, then mix together with a fork.

When cooked, drain the pasta and return to its, still hot, saucepan. Add the creamy muixture and the reserved crispy lardons and stir over a medium heat. In a traditional carbonara the sauce would cook in the heat of the cooked pasta, but we need heat here to thicken what is effectively a bacon and parmesan custard. Keep stirring until the sauce thickens and clings nicely to the pasta.
Serve into warmed pasta bowls and consume greedily with a glass of robust white wine.


Saturday, 24 November 2012

Strong Ginger Beer

This will produce a small batch (5 litres) of strong (~7%abv) warming ginger beer, not as sweet as Crabbies Ginger Beer but richer in maltiness.


Ingredients

1kg of dark or medium, dry malt extract (or 1.3kg of liquid malt extract)
300g root ginger
500g honey (optional, but will up the strength to nearer 8%)
Sachet of Ale Yeast

Method

Cut the ginger into small pieces and bash in a pestle and mortar (or in a freezer bag with a rolling pin)
Boil a litre of water in a large saucepan and add the bashed ginger and the malt extract.
Stir on a high heat until the malt has dissolved, it may form clumps until the water gets hot enough.
Once boiling and all the malt has dissolved, remove from the heat and add 4 litres of cold water, if using honey then add just before the cold water.

Please note: after boiling is over, any equipment coming into contact with this brew should be sanitised and this can be performed with a range of products from a home brew shop.  If you can't get to a home brew shop, you could use a product for sanitising babies' bottles, but if you can't get to a home brew shop, you will probably also need to compromise on two other key ingredients by using bread yeast and ordinary malt extract.  It will still work using these ingredients but the finished beer will not be quite as fine as if ale yeast and brewing grade malt is used.
Check the temperature, if above 22 C, place the pan in a sink of running cold water, stirring until the temperature comes down to a level that the yeast can cope with.  This is usually stated on the pack of yeast, but for an ale yeast, this is typically 18-22 C.  The stirring will serve to speed the cooling process and, if robust enough, will help aerate the malt solution (known as wort in brewing terms, pronounced "wert") dissolving gasses lost from the solution when boiled; An aerated wort is a better environment for the yeast to start-off in.
When at the right temperature, pour the wort into a sanitised fermenting bin.  The fermenting bin or bucket is a food grade plastic bucket, but you can use a container of any food grade material, such as a glass demijohn or carboy.  Sanitisation cleans the container to a level where there is near-as-dammit no microbes present to compete with the yeast for colonisation of the wort that is about to fill the bucket.
Once in the fermenting bin, add the yeast and stir vigorously for a minute to give the yeast a kick start.  Place a lid loosely on the bucket, to prevent anything falling or crawling into the beer but not sealed, so the carbon dioxide gas produced from fermentation can escape.  A sealed container would swell with built-up pressure and eventually blow making quite a mess.  If desired, you could use a container fitted with a bubble trap which allows the gas to escape and better protects the beer from ingress of anything else, but this is not absolutely necessary - I hardly ever bother.  However, the bubble trap will give you an indication of the progress of fermentation:  the frequency of bubbling slows right down then stops when fermentation is over.
After a couple of weeks or when the fermentation is over you are ready to bottle the ginger beer.  To be sure the fermentation is over, you should use a hydrometer and when the reading is low enough and stable for a few days, you can bottle.
As ever: sanitise bottles and equipment.  If using a syphon tube, make sure the bits of ginger won't block it, by using an attachment that sits on the base of the fermenting bin that won't block, or by attaching a small piece of muslin cloth to the end of the tube.
Prime each bottle with household sugar at the rate of one teaspoon per litre of beer.  Seal the bottles and leave at room temperature for a week for the sugar to be fermented to alcohol and carbon dioxide.  Then leave in a cool or cold place for a few weeks for the carbon dioxide to dissolve in the beer, to carbonate it.
If you are unsure if the beer had fully fermented before bottling, use plastic bottles.  If they blow, they will still make a mess, but not quite as scary as exploding glass bottles.
When ready to drink, handle the bottles gently so as not to kick-up the sediment and pour in a slow and smooth single motion, with light behind the bottle so you can see any sediment that may come with the last bit of the beer in the bottle.
Sit back and enjoy the beer, the maltiness and ginger giving a warm feeling on a cold day.


Friday, 16 November 2012

Chocolate Cream Pies

As a child I had a penchant for those clear pots of smooth chocolate dessert topped with sweetened whipped cream. To be honest I could happily demolish one now, but here's my version in pastry cases:
cream topped chocolate pies

For the pastry cases


Ingredients

4oz plain flour
Pinch salt
2 tsp sugar
2oz butter
30ml or more of cold water


Method


Place the flour, sugar and salt in a mixing bowl.
Cut the butter into small dice and rub into the flour with finger tips.
Once it all looks like fine bread crumbs, add 2 tablespoons of water and bring together with a butter-knife to start forming a firm dough, you may need a tad more water if it doesn't start coming together. Form a ball of dough in your hands, cover in food wrap and place in the fridge for half an hour.
Roll out the pastry on a floured surface to the thickness of a penny.
Cut out discs with a cm pastry cutter and carefully place the discs in a greased muffin tin, reforming the dough, rolling out and cutting again until you have 12 discs (there is only just enough pastry to do this)
Oven fired up and set to gas mark 5.
Place the lined muffin tin in the fridge while your oven heats up, this should stop the pastry shrinking when it is baked.
Bake in the oven for 7 minutes then remove from the oven, brush with egg wash (egg yolk with a dash of milk) pushing back any pastry that has ballooned up.
Return to the oven for a further 14 minutes.

For the filling


Ingredients

2 Tbsp Cocoa powder
1 heaped tsp instant coffee (optional)
1oz Cornflour
2 Tbsp Milk
15 fl oz Milk
Sugar
Butter

Method

Slake the cocoa and cornflour (and possibly the coffee, decaff if preferred) with the 2 tbsp milk.
Heat the 3/4 pint milk to boiling then whisk into the cocoa paste and place in a pan and boil for 2 mins, whisking.
Heat off.
Whisk in 1oz butter and 4 tbsp caster sugar.
Whisk for 2 mins.
Pour into pastry cases.
Cool over night.

For the Chantilly Cream topping

Ingredients

10 fl oz Whipping cream
2 tsp icing sugar
2 tsp Amaretto (optional)
Part of a small bar of chocolate

Method 

Whip the cream, then add the icing sugar or use only 1 tsp icing sugar and add the Amaretto liqueur before whisking again.
Pipe the cream onto the pies and grate chocolate over the top.

Friday, 9 November 2012

Lemony Butter Biscuits


Makes: 2 lots of 18-20 biscuits
Prep time: 10 mins prep then 30 mins fridge plus 2 hrs more fridge time or over-night
Cooking time: 20 minutes
Skill level: Piece of pith
Equipment:  Mixing bowl and wooden spoon / food mixer; zester or fine grater; Sharp knife; cling film; baking sheet; cooling rack

Ingredients


175g Butter (unsalted)
Zest of a whole lemon
lemony butter biscuits50g Caster sugar
50g Demerara sugar
1/2 tsp Vanilla extract
225g Plain flour

To coat
100g or so of Demerara sugar

Method

Beat the butter until soft and creamy.
Mix in the zest, caster sugar, Demerara sugar and vanilla and beat until light and fluffy.
Sift in the flour and mix / bring together the dough.
Lightly kneed the dough until smooth (a matter of seconds should do)
Divide into two, wrap and refrigerate for 30 minutes.
Shape each piece of dough in to a 15cm long cylinder and roll in the Demerara sugar to coat before wrapping in cling film and refrigerating for at least 2 hours.
I normally put one cyclinder in the freezer for another day.
Once out of the fridge or defrosted slice 15 discs (1cm thick) and place on a baking sheet about 2 cm apart.
Bake at 160C for about 20 minutes or until a light golden colour and firm.
Remove from the oven and wait for a few minutes before removing to a cooling rack.


Friday, 2 November 2012

Quick Chicken Bhuna

Serves: 4 people
Prep time: 10 minutes
Cooking time: about 20 minutes
Skill level: Competent
Equipment: Pestle and Mortar or spice mill; Frying pan

chicken bhuna

I think we all have a dish up our sleeve that we can cook without too much effort or too many ingredients, which yields a fantastic result at variance to the effort put in to it.  This recipe is a perfect example: Not a jar of sauce or tub of curry powder in sight, but no lengthy prep or extensive list of spices to buy-in and leave to expire, should you not cook spicy food often.
The sauce for this bhuna is aromatic with a gentle warmth and quite thick. Perfect for eating with chapati but goes equally well with rice or naan bread.

Ingredients


1 tbsp cardamon pods
Onion salad crispies
8 cloves
1 tsp dried chilli flakes
8 pepper corns
Salt
Oil or ghee
6 diced chicken thighs or a whole chicken, jointed
4 cloves of garlic
Root ginger (about the same amount as the garlic)
Tub of onion salad crispies
Greek yoghurt
Coriander leaves


Method

Place the cardamon, cloves, chilli, peppercorns and a pinch of salt in the mortar then bash and grind with the pestle to reduce the spices to the size of ground pepper (the green pods of the cardamon won't go very small but that's fine)
Place the ground spices in a dry pan and place on a moderate or high heat until the spices start to smoke.
Pour in the oil or ghee and add the diced chicken.
Fry until browned all over.
Place a teaspoon of salt flakes in the mortar (add less if fine table salt), add the garlic cloves, peeled, and the same amount, by eye, of peeled root ginger.
Bash with the pestle to a paste and add to the pan.
Fry, stirring, for a few minutes until the chicken is essentially cooked through.
Add the tub of crispy, fried onions then a generous amount of Greek yoghurt to get a nice, thick sauce.
Heat through then add a handful of chopped coriander leaf before serving.


Note: You can substitute the tub of crispy onions with a whole onion fried in advance until browned.

Wednesday, 31 October 2012

Pumpkin and Chestnut Soup

Pumpkin and chestnut soup
Wondering what to do with the leftover insides of the pumpkin after carving your Jack o'lantern, but want something other than pumpkin pie?  Then try this autumnal soup:

Ingredients

10 Chestnuts (or a tin / pack of prepared chestnuts)
One small Pumpkin
600ML Chicken stock
A dash of cream, yoghurt etc
Nutmeg

Method

Peel the chestnuts in whatever way you see fit or use pre prepared ones; Usual method is to make a cut on the curved face and roast or blanch for 5 mins before peeling.
Place the peeled chestnuts in a pan with the pumpkin flesh, minus the tough exterior and the seeds and stringy bits from inside.
Cover with the stock.
Bring to the boil and simmer for 20 minutes.
Blitz.
Grate nutmeg over and season with salt if needed (depends on the stock used).
Stir in the cream, yoghurt or creme fraiche etc
Serve

Saturday, 27 October 2012

Miraculous Morning After Cookies

Makes: 20 cookies
Prep time: 5 minutes
Cooking time: around 9 minutes
Skill level: Easy as falling off a bar-stool
Equipment:  food mixer / large spoonerism

From as far back as I can remember I have enjoyed chocolate chip cookies with a glass of milk. Mum baked them from a recipe in a Be-Ro flour cookery booklet at a time of my life when the most pressing issue seemed to be whether you were left with milk in the glass after the cookie was gone or whether there was still cookie to be consumed after the milk glass was drained. Invariably it would lead to countless toppings-up of milk and additional cookies. Before long I was following the fail-safe recipe myself with a frequency that makes me wonder why I wasn't a more portly youth and I continued to bake them when I went to university. Which is when the miraculous morning after cookies made their first appearance.
It was in a year of University life where I had enjoyed the second year of my degree so much that I had the need to do it again and in a bid to remove the temptation to go out on the town every night with house-mates, I elected to live in a flat on my own. This was very successful from a culinary point of view, because I had a kitchen to myself - complete with a magic socket, but more about that another time - but less successful with regards to knuckling down to work thanks to the advent of the more affordable mobile phone contract:
BEEP-BEEP Pub?
It was on my return from a rather heavy night that I stumbled into my flat and into bed via the kitchen.
The following morning I rose, a little less than bright-eyed and bushy-tailed, and padded into the kitchen.
As far as I could tell, I had returned the previous night and had a bit of a fight with a bag of flour, looking at the state of the kitchen, but there, amongst the snow-scape and unwashed kitchenware, was a cooling rack of chocolate chip cookies. I had no clear recollection of baking them, but they were infinitely better than any I had baked before. A magnificent restorative they seemed to be, but the only fly in the ointment was that I had no clear recollection of what I did to make them so good.
Over the next few weeks I tried varying the recipe with different amounts of this and that ingredient, shorter cooking times or lower temperatures but to no avail. It was some time later that I figured out what I had done. It was down to the lazy cack-handedness of a drunk student. The quantities were the same, but out of laziness I had used a food processor to chop the chocolate into chips at the same time as using it to mix the dough and over chopped the chocolate to fine grains that melted into the cookies on baking, making them more moist.
The following recipe is not that of the original Be-Ro flour booklet, but rather improved in my opinion and not just indicated as a restorative for self-inflicted alements but great for a little comforting treat too.

Ingredients

100g chocolate
100g butter
100g demerara sugar
1 egg
1/2 tsp vanilla extract
200g self-raising flour

Method

Get rather relaxed with your favourite mood fixer. (Optional step)

Break the chocolate into chunks and place in the food mixer fitted with a rotating blade then blitz until the chocolate is broken into small pieces.

Add the butter and sugar then blitz again.

Add the egg, vanilla extract and the flour then blitz to a dough.
Shape 20 balls of dough on a greased baking sheet and bake for about 9 minutes at 180 C, Gas Mark 4
Remove from the oven and leave to stand for 5 minutes to firm-up before transferring to cool on a wire rack until peckish or conscious.


Serve with a glass of milk and suitable analgesia p.r.n.

Note: Best left to cool completely before eating, as this gives the best texture to the cookie.


In video form with some variation:


Wednesday, 24 October 2012

Soft White Olive Oil Bread Rolls, Over-night method

Makes: 15 little rolls
Prep time: 5 to 10 minutes the night before and 10 to 15 minutes the next morning.
Cooking time: 21 minutes
Skill level: Not Master of the rolls
Equipment: Mixing bowl; scales and measuring jug; hands or a mixer with dough hook; kitchen knife; baking parchment; pastry brush

Ingredients

500g Spelt Flour (or strong white flour)
1 tsp Salt
2 tbsp Olive oil
7g Sachet Yeast
2 tsp honey
300ml Luke warm water

Method

Mix all the dry ingredients and the oil together by hand or with a mixer fitted with a dough hook.
Add the honey and the water gradually while mixing / kneeding to get a moist, elastic dough.

Cover the bowl and place in the fridge over-night.

In the morning, get the dough out of the fridge and light the oven.


Kneed by hand on a clean work-top smeared with olive oil so the warmth from your hands warms up the dough.  When the dough is elastic again and the chill has gone from it, roll the dough into a long sausage shape before cutting into 15 pieces.  Shape each one into a ball and place on a baing sheet lined with parchment and oiled with olive oil.  Place about a centimetre apart and leave to rise in a warm place.


When the rolls are just kissing together, place in the oven at gas mark 7 for 7 minutes.


Reduce the heat to gas mark 5 for 14 minutes.

Remove from the oven and brush with olive oil whilst still warm.


Leave to cool and absorb the oil (this adds flavour, a slight sheen and softens the crust).

When they are just warm or fully cooled, they're ready to go.

Tuesday, 23 October 2012

Pea & Ham Soup

Serves: 3 to 4 (3 filling lunch portions or 4 starters)
Prep time: 5 minutes (depending on how far away your fridge / freezer is)
Cooking time: about 10 minutes
Skill level: Pea & Ham-fisted
Equipment: Measuring jug; Saucepan; Blender; Spoons; Dishes; Chopping board; Kitchen knife

pea and ham soup

Following on from cooking gammon in snakebite, the flavoursome cooking liquor is perfect for making pea and ham soup.  It is so quick and easy, seeing as the stock is so full of flavour and peas cook so quickly.

Ingredients

500ml Gammon cooking liquor
600g Frozen peas
10ml Corn flour
300g or so of Cooked gammon


Method

If you made the gammon in snakebite the night before, the cooled cooking liquor will have jellified in the fridge, but you should still be able to splodge some into a measuring jug (after having spooned-off the solidified fat on the surface) to measure 500ml before walloping it into a saucepan.

Bring to the boil before adding the frozen peas and when it all comes back to the boil, cook for 4 to 5 minutes.

Blitz the soup with what ever blender you have, being careful not to splatter yourself and kitchen with boiling hot soup.  I you didn't blend the soup in the saucepan, return it to the pan.  Slake (wet) the cornflour with a little cold water in a small dish to get a pourable liquid rather than a paste when stirred.  If you have created a non-Newtonian, dilatant fluid then - firstly - well done you for paying attention in science class but stop basking in the glory of knowing long words and add some more water to the cornflour paste.
Pour the cornflour solution into the soup and bring to a simmer, stirring until the soup thickens up.

Dice the cooked gammon, then scatter into the soup to heat it through before serving.

Serve with a few nice, hot, home made rolls with butter (rolls made with half wholemeal and half strong white flour work a treat)


Sunday, 21 October 2012

Slow cooked Gammon Knuckle in Snakebite

Serves: 2 generously, with some left-over
Prep time: 20 minutes
Cooking time: 6 to 8 hours
Skill level: Ham-fisted upwards
Equipment: Pint pot or other measure; medium-large saucepan; slow cooker (or use oven-proof dish with lid); carving fork or other utensils to lift the cooked gammon out.


I cobbled this recipe together in an ad hock way after the new girl at the butchers sold my wife gammon knuckles instead of the lamb shanks she had ordered.  At the time I had brewed up a batch of lager and one of cider and filled one keg of each and a third keg with half of each to give us snakebite on draught for a nostalgia hit from student days.  I'd cooked gammon in cider before so I thought I'd try it in snakebite and use my new slow cooker.  I was so pleased by the delicately aromatic, melt-in-the-mouth result that I've not changed the recipe and have replicated it many times.  I just hope next time I ask for gammon knuckle, she doesn't get me lamb shanks.

Pouring home brewed snakebite
Home brewed Snakebite (optional)

Ingredients

One gammon knuckle
Cold water, to cover
1 Pint of cider
1 Pint of lager
1 Pint of water
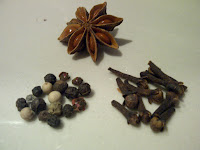
1 Star anise
1 Tsp pepper corns
star anise, pepper corns, cloves1 Tsp cloves

Method

Preheat the slow cooker as directed by the manufacturer.
Place the gammon knuckle in a pan and cover with cold water.
Bring to the boil then discard the water.
pouring cider and lager over gammonAdd the three pints of liquid and bring back to the boil before transferring to the preheated slow cooker.
Add the spices and cook on low for 6 to 8 hours.
If you don't have a slow cooker, place in a lidded, oven-proof dish and, once simmering, place in the oven at around 150 degrees C, 300 F or Gas Mark 2 (vary the temperature so it's only just simmering - just the odd bubble surfacing)

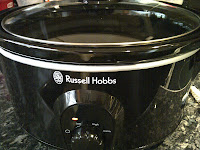
slow cookerOnce cooked, lift out the gammon and the meat should easily fall away from the bone and separate from the skin and fat.  Serve as you like.

I enjoy it simply with chips and Dijon mustard mixed with mayonnaise, or with mashed potato for a winter warmer of a dish.  Fantastic the next day on sandwiches or for breakfast with fried eggs and a little English mustard.

Recommended side dish: Shredded cabbage sauteed in olive oil with a little crushed juniper berry, a grind of salt and pepper and grated nutmeg.

Scrimping tip: Keep the cooking liquor to use as the base for soup; For the classic pea and ham soup: add peas (fresh, frozen or dried) and cook until done, then blitz,  and add some of the leftover gammon.

Thursday, 21 June 2012

Keeping Hens in the Back Garden

I’m a bit behind the curve with keeping hens in my back garden; it’s hardly trailblazing these days. Obviously it’s not new at all to keep hens at home: my granddad had quite a few hens, but in more recent history it seemed a bit unusual, a bit Tom and Barbara, to have livestock in the back yard. Right now, it seems quite the fashion, possibly thanks to Hugh FW. I’m certainly no smallholder or farmer. Hen keeping will be slotted into our day-to-day family life, to fit in amongst the school run, work and all the after-school ferrying around. My initial feelings, before getting the hens, are of practical utilitarian hen keeping; they are not pets, they are livestock; I will be dispassionate, yet humanitarian (or does that only apply to fellow humans? Perhaps henitarian would be the word?) not getting emotionally attached to the birds. Well, who’s placing bets on how quick that approach is going to fly out the window without its wings clipped? It’s not looking good:

I booked myself on a poultry keeping course at Reasehealth Agricultural college, with a view to learning lots of information and practical skills, including handling poultry, getting hands on and holding them and, oh dear, they are rather lovely little things, and would you believe how soft their feet are… ahem. Pull yourself together Leo; remember: Not pets; Livestock. Keeping hens was never intended to be a source of cheap eggs, the initial out-lay on hen house, fencing and all the other items required will see to that; although you can’t make an omelette without breaking eggs, you can certainly make one without breaking even. It seems that it will serve, as well as a hobby or escape from modern life, as a middleclass angst soother: Most of us now feel abashed or in need of self flagellation if we were to purchase non-free-range eggs, because it now seems a given that battery eggs are loathsome to the very core. But, if I may add to that middleclass angst: industrial egg production, even if classed as free-range, is not without its stress to blight the lives of our feathered friends. Free-range hens, if kept in vast numbers, can have quite a stressful existence. Hens like a status quo; as a breed these foul, in their natural habitat, exist in smallish groups and, after initial squabbling, establish a pecking order, a hierarchy. Once established, they know one another and know their place. In vast numbers, this is not possible and what would be an initial, brief period of stress in a small group, is a constant round of squabbling and stress on a day to day basis. Now, I’m no bleeding-heart liberal, there is a practical and dispassionate point here: stressed hens are more susceptible to illness and disease. To bring matters round to some degree of perspective, it’s still better than being a battery hen. But what a good excuse for this new venture at home: guilt-free eggs.

After reading up far more than is strictly necessary, to the extent that my wife has said that if I buy another poultry book, I’ll need a buck-buck-bookcase to keep them in, I now feel prepared to go ahead and get some hens. First step: Build a hen house and chicken run. I best stop typing and get building…

Tuesday, 24 January 2012

Apple Wine. A low cost first attempt at wine making

Beer, I've got down to a fine art, but I'm new to making wine, so I'm starting-off simple.
Already I've committed my first newbie crime of not following the instructions. I don't know why I do this. As, pretty much, a beginner, I should follow the recipe for a tried and tested wine and vary it afterwards. So when instructed to dilute apple juice and add sugar, I couldn't bring myself to water down a flavour-giving ingredient. I started with neat apple juice and added less sugar. I say neat apple juice but it was from concentrate, so at some point it's been diluted. I used the cheap stuff because it is already clear.
Fannying-around step two: I added medium toast, oak chips. Here's where I'm up to so far:


Day 1
4 litres Apple juice (Euroshopper RRP 75p per litre, Specific Gravity 1.046) Aerated in brew-bin and added yeast nutrient.
Hydrated Bioferm "cool" yeast as per pack instructions.
30g Oak Chips into demijohn with a splash of boiling water.
Pitched yeast into brew-bin and aerated with a balloon whisk, then poured into demijohn.
Fitted bubble trap.
Within afew days a head was thrown up and blew out through the bubble trap.
Day 4
Calmed down so added some of the extra sugar needed to make it up to strength: 250g dissolved in a little boiling apple juice, then cooled.
Another blow out.
Day 5
Added the last lot of sugar: 280g in more apple juice.
Day 10
Topped up to the neck of the demijohn with apple juice.
Day 11
Demijohn got filmed by Endemol and may appear on telly, only a minor part, non-speaking.
Day 26 
Syphoned off sediment into another demijohn, topped up to the neck with more apple juice. Had a sneaky taste mid syphon: Appley and winey would you believe?
Day 34

Still sitting there, periodically going "blup"
Day 180
Finally got round to another investigulp.  Tasting much more like it but a little too lively, so in need of degasing, which is essentially agitating to release the carbon dioxide out of solution.  This was combined with the addition of half a Campden tablet, crushed, to kill off the yeast.  If I were going to bottle it to keep, I would also have added a similar amount of potassium sorbate to prevent fermentation from any wild yeasts etc that may get into the wine.  I was too thirsty to keep the wine too long, so syphoned it into a 5 litre wine box and put it into the fridge overnight to chill.  The resulting wine was very drinkable; a nice level of acidity, gentle oakiness and a subtle apple flavour.


This recipe I will certainly be repeating as my house wine, so easy and so cheap, less than one pound a bottle.


Here's a video about the wine